用一个 JSON 文件为 Python AI 智能体赋予持久记忆

我们知道 AI 智能体已经变得多么流行。从规划旅行、推荐最值得购买的手机型号,到读取我们的医疗报告并像专业医生一样行动,我们现在已经高度依赖这些 AI 智能体。
从技术上讲,AI 智能体不同于聊天机器人,因为它不仅回答 questions,还具备接收信息、处理信息,并提供比较和辅助决策的能力。大多数 AI 聊天机器人一次只处理一条消息。你提问,它们回答,然后对话继续进行。但当你希望 AI 记住你之前讨论的内容,或使用计算器之类的工具来为你的问题提供合适答案时,会发生什么?
这正是记忆和工具的用武之地!AI 智能体不只是能生成文本。智能体可以记住之前的对话,判断何时需要外部工具,使用该工具,然后利用结果生成最终回复。
在本文中,我们将用 Python 构建一个简单的 AI 智能体——它能够存储过去的对话、回忆最近的消息,并在需要时使用工具。我们将用 JSON 文件保存它的记忆,通过 API 将其连接到语言模型,并编写智能体可调用来执行任务的 Python 函数。
本文是我关于 AI 智能体系列的第三篇,第一篇以非常详尽且对初学者友好的方式解释了 AI 智能体的构建。如果你是新手,可以在阅读本文之前先看看那篇文章:
这个 AI 智能体将具备三项核心能力:
记忆——将之前的对话存储在 JSON 文件中。
工具——提供一个计算器和一个简单的网络搜索工具。
决策——让语言模型自行判断是否需要使用工具。
实现方式刻意保持简单,以便理解底层架构。我们的智能体遵循以下基本流程:
带有记忆与工具的 AI 智能体(图片由作者提供)
搭建项目并创建文件
首先,正如我们在上文提到的以往项目中所做的那样,我们会在你选择的 IDE(我将使用 PyCharm)中创建项目文件夹,然后创建 Python 文件 main.py。这个 Python 文件将保存并执行代码。
创建项目文件夹(图片由作者提供)
安装并导入所需的库
创建好 Python 文件后,下一步是安装构建 AI 智能体所需的相关库和模块,并额外为其集成记忆功能。如果你的系统中尚未安装,请打开 IDE 中的终端,安装 OpenAI,然后将这个 Python 包导入 main.py。除了作为构建 AI 智能体所依赖的主要包的 OpenAI 之外,我们还会安装 python-dotenv 等其他包。
import osimport jsonimport datetimefrom dotenv import load_dotenvfrom openai import OpenAI
从上方的代码可以看到,我们还导入了其他包和库。
os 模块让 Python 能够与计算机的操作系统交互。在我们的项目中,我们会用它来检查记忆文件是否存在,并从环境变量中读取 API key。
json 模块帮助我们以 JSON 格式存储和读取数据。我们会用它把智能体的对话保存到一个名为 memory.json 的文件中。
datetime 模块让我们可以处理日期和时间。我们的智能体将用它来记录每条对话消息被保存时的时间戳。
load_dotenv 函数从 .env 文件中读取环境变量。我们会用它来加载 API key,而无需把密钥直接写进 Python 代码里(出于安全考虑)。
OpenAI 是主模块,它让我们的 Python 程序能够通过 API 向语言模型发送请求。在这个项目中,我们会用它来连接 OpenRouter。
创建 Env 文件并加载 API key
与之前一样,我们将按照惯例新建一个文件,并将其命名为 .env。这个文件用于存储 API Key、密码等机密信息。我们会在项目文件夹中创建该文件,并用它来存储 API Key。
为了生成 API Key,我们将前往 OpenRouter,它是免费的,并允许我们选择任意想要的 AI 模型。如果你还没有创建账号,请先注册一个账号,点击 "API Keys",然后点击 "+ New Key"。指定项目及其他相关信息,然后复制该 Key,将其粘贴到 .env 文件中的 OPENAI_API_KEY 变量里。稍后我们会借助之前安装的 dotenv 包,在 Python 主文件中调用这个变量。
OpenRouter 控制面板(图片由作者提供)
.env 文件中的 API Key(图片由作者提供)
一旦我们把 API Key 放入 .env 文件,接下来就将其加载到 Python 主文件中。
load_dotenv(override=True)api_key=os.getenv("OPENAI_API_KEY") if not api_key: raise Exception( "OPENAI_API_KEY not found. Check your .env file" )
load_dotenv() 函数会读取存储在 .env 文件中的变量,并使其可供 Python 使用。override=True 这一设置意味着 .env 文件中的值将替换同名的现有环境变量。
api_key=os.getenv("OPENAI_API_KEY") 会从环境变量中获取 API Key,并将其传给客户端进行身份验证。
如果 API key 缺失会怎样?if 条件语句会检查 api_key 是否为空或为 None。如果找不到 key,raise Exception() 会终止程序并显示错误信息。这有助于我们尽早发现问题,而不是等到应用程序尝试连接 AI 服务时才失败。
现在我们有了 API key,就可以创建一个客户端,把我们的 Python 程序连接到 AI 服务。
client = OpenAI( base_url="https://openrouter.ai/api/v1", api_key=os.getenv("OPENAI_API_KEY"))
上面代码的第一行创建了一个 OpenAI 客户端对象,并将其存储在变量 client 中。每当我们想向 AI 模型发送请求时,都会用到这个对象。
base_url="https://openrouter.ai/api/v1" 告诉客户端把 API 请求发送到哪里。这里我们使用的是 OpenRouter,因为它提供了多种可供选择的模型,而且是免费的!
os.getenv("OPENAI_API_KEY") 从环境变量中获取 API key,并将其传给客户端进行身份验证。
构建记忆系统 —— AgentMemory 类
现在环境已经搭建好,客户端也创建完成了,接下来我们进入本程序中要构建的三个类中的第一个。我们要构建的第一个类是 AgentMemory 类。
请记住,类是用来创建对象的蓝图。程序员使用类,以封装且可复用的方式方便地打包属性和方法。你可以通过下面这篇文章,以实用的、基于项目的方式了解更多关于类的知识:
创建记忆类
我们将用以下代码初始化该类,然后逐一添加方法。这段代码搭建了智能体的记忆系统。
class AgentMemory: def __init__(self, file="memory.json"): self.file = file self.data = self.load()
class AgentMemory:创建一个处理智能体记忆的类。
__init__ 会在我们从这个类创建对象时自动运行;在本例中,它使用 memory.json 作为默认文件名。
self.file = file 保存文件名,以便其他方法可以使用它。
self.data = self.load() 会将之前保存的任何对话加载到 self.data 中;我们将在接下来定义这个 load() 方法。
简单来说,每当我们创建一个 AI 智能体时,智能体内存(agent memory)会找到它的内存文件,并读取其中已经写入的内容。如果没有已保存的内存,它可以从一个空内存开始。没有内存的话,每次我们重启程序,智能体都会在完全不记得此前对话的情况下重新开始。本节课将为我们的智能体提供一个简单的持久化内存系统,因为对话会被存储在一个文件中,而不再只是存在于 Python 程序运行期间。
接下来我们定义 AgentMemory 类的第一个方法。
def load(self): if os.path.exists(self.file): with open(self.file, "r", encoding="utf-8") as f: return json.load(f) return { "conversations": [] }
load() 方法会检查内存文件(例如我们之前定义的 memory.json)是否已经存在。
如果 memory.json 存在,就用 json.load(f) 加载其内容,它会读取 JSON 数据并转换为 Python 对象,例如字典。
如果它不存在,智能体就会以一个空的对话列表 "conversations": [] 开始。这为内存系统提供了一个简单的结构,可以随时间不断增长。
接下来,我们将创建 remember() 方法。这个方法执行两项任务。
def remember(self, role, message): self.data["conversations"].append({ "role": role, "message": message, "time": str(datetime.datetime.now()) }) with open(self.file, "w", encoding="utf-8") as f: json.dump(self.data, f, indent=4)
remember() 方法接受 3 个参数:对象本身、role(表示消息是谁发送的)以及 message(即我们希望智能体记住的实际文本)。
原文较长,译文为节选;译文由英文原文机器翻译,术语按行业惯例统一,可在文末展开原文核对。
查看英文原文(Give Your Python AI Agent Persistent Memory with One JSON File)
We know how popular AI Agents have become. From planning a trip and suggesting the best mobile model to buy, to reading our medical reports and acting like a professional doctor, we are now highly dependent on these AI Agents.
Technically speaking, an AI agent is different from a chatbot, as it not only replies to questions, but possesses the ability to take in information, process it, and provide comparison and aid in decision-making. Most AI chatbots work one message at a time. You ask a question, they answer, and the conversation moves on. But what happens when you want an AI to remember what you discussed earlier or use a tool like a calculator to provide an appropriate answer to your question?
That's where memory and tools come in! AI agents can do more than simply generate text. An agent can remember previous conversations, decide when it needs an external tool, use that tool, and then use the result to produce a final response.
In this article, we'll build a simple AI agent in Python — one that can store past conversations, recall recent messages, and use tools when needed. We'll use a JSON file to save its memory, connect it to a language model through an API, and write Python functions that the agent can call to perform tasks.
This article is the third in my series on AI Agents, the first one explaining the building of AI agents in very elaborate and beginner-friendly terms. You can go through the article if you are a newbie before reading this one:
The AI agent will have three core capabilities:
Memory — stores previous conversations in a JSON file.
Tools — provides a calculator and a simple web-search tool.
Decision-making — lets the language model decide whether it needs to use a tool.
The implementation is intentionally simple so that the underlying architecture is easy to understand. Our agent follows this basic flow:
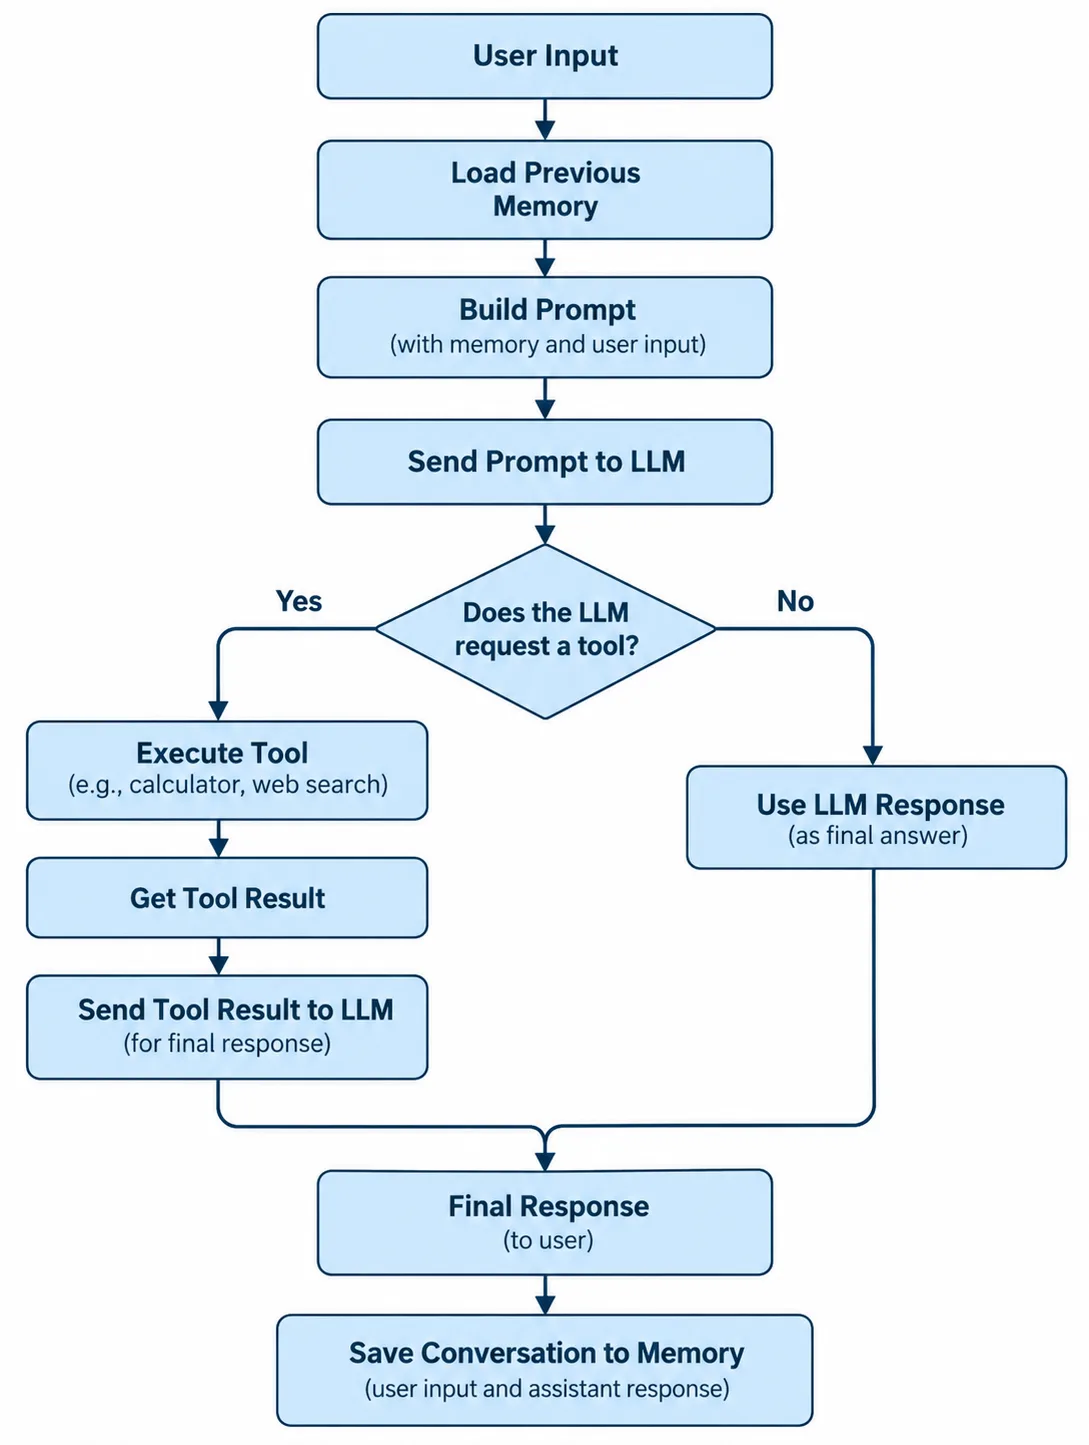
AI Agent with Memory & Tools (Image by Author)
Setting up the Project and Creating the Files
First of all, as we did with the previous projects mentioned above, we will create the Project Folder in the IDE of your choice (I will be using PyCharm) and then create the Python File main.py. This Python file will hold and execute the code.
Creating the Project Folder (Image by Author)
Installing and Importing the Required Libraries
Once we have created the Python file, the next step is to install the relevant libraries and modules that are required for building an AI Agent, and additionally integrate memory into it. If not already installed on your system, go to the terminal in your IDE, install OpenAI and then import this Python package into your main.py. Along with OpenAI, which will be the main package upon which the AI Agent is built, we will also install other packages like python-dotenv.
import osimport jsonimport datetimefrom dotenv import load_dotenvfrom openai import OpenAI
As can be seen in the code above, we have also imported other packages and libraries.
The os module lets Python interact with the computer's operating system. In our project, we'll use it to check whether a memory file exists and read our API key from environment variables.
The json module helps us store and read data in JSON format. We'll use it to save our agent's conversations in a file called memory.json.
The datetime module lets us work with dates and times. Our agent will use it to record the timestamps when each conversation message was saved.
The load_dotenv function reads environment variables from a .env file. We'll use it to load our API key without writing the key directly into our Python code (for security purposes).
The OpenAI is the main module that lets our Python program send requests to a language model through an API. In this project, we'll use it to connect to OpenRouter.
Creating the Env File and Loading the API Key
As we did before, we will create a new file and name it .env as per convention. This is the file that allows us to store secret information like API keys, passwords, etc. We will create this file in our project folder and use it to store the API Key.
In order to generate the API Key, we will go to OpenRouter, which is free and allows us to choose any AI model of our choice. If you do not have an account already created, create an account, click on "API Keys" and click "+ New Key". Specify the project and other relevant details, then copy the key and paste it into the .env file in the OPENAI_API_KEY variable. This variable will be called into the main Python file with the help of the dotenv package that we installed earlier.
OpenRouter Dashboard (Image by Author)
API Key in .env file (Image by Author)
Once we have the API Key in the .env file, we will load it into the main Python file.
load_dotenv(override=True)api_key=os.getenv("OPENAI_API_KEY") if not api_key: raise Exception( "OPENAI_API_KEY not found. Check your .env file" )
The load_dotenv() function reads the variables stored in our .env file and makes them available to Python. The override=True setting means that values from the .env file will replace existing environment variables with the same names.
The api_key=os.getenv("OPENAI_API_KEY") retrieves the API key from our environment variables and passes it to the client for authentication.
What if the API key is missing? The if condition statement checks whether api_key is empty or None. If no key is found, raise Exception() stops the program and displays an error message. This helps us catch the problem early instead of letting the application fail later when it tries to contact the AI service.
Now that we have our API key, we can create a client to connect our Python program to an AI service.
client = OpenAI( base_url="https://openrouter.ai/api/v1", api_key=os.getenv("OPENAI_API_KEY"))
The first line of the above code creates an OpenAI client object and stores it in the variable client. We'll use this object whenever we want to send a request to the AI model.
base_url="https://openrouter.ai/api/v1" tells the client where to send its API requests. Here, we're using OpenRouter, as it provides a number of models we can choose from and it is free!
The os.getenv("OPENAI_API_KEY") retrieves the API key from our environment variables and passes it to the client for authentication.
Building the Memory System — AgentMemory Class
Now that the environment is set up and the client is created, let us move to the first of the three classes that we will build in this program. The first class we will build is the AgentMemory class.
Remember that a class is a blueprint that is used to create objects. Programmers use classes to conveniently bundle attributes and methods in a packaged and reusable way. You can learn more about classes in a practical, project-based way with the following article:
Creating the Memory Class
We will initialize the class with the following code, and subsequently add methods one by one. This code sets up the agent's memory system.
class AgentMemory: def __init__(self, file="memory.json"): self.file = file self.data = self.load()
class AgentMemory: Creates a class that handles the agent's memory.
The __init__ runs automatically when we create an object from this class, in this case, it uses memory.json as the default filename.
self.file = file saves the filename so other methods can use it.
self.data = self.load() loads any previously saved conversations into self.data, we will define this load() method ahead.
In easy words, whenever we create an AI Agent, the agent memory finds its memory file and reads what's already written in it. If there is no saved memory, it can start with an empty one. Without memory, every time we restart the program, the agent would start with no knowledge of previous conversations. This class will give our agent a simple persistent memory system because the conversations are stored in a file rather than only existing while the Python program is running.
Let us move to defining the first method of the AgentMemory class.
def load(self): if os.path.exists(self.file): with open(self.file, "r", encoding="utf-8") as f: return json.load(f) return { "conversations": [] }
The load() method checks whether the memory file, such as memory.json that we defined earlier, already exists.
If memory.json exists, its contents are loaded using the json.load(f) that reads the JSON data and converts it into a Python object, such as a dictionary.
If it doesn't exist, the agent starts with an empty conversation list "conversations": []. This gives the memory system a simple structure that can grow over time.
Next, we will create the remember() method. This method performs two tasks.
def remember(self, role, message): self.data["conversations"].append({ "role": role, "message": message, "time": str(datetime.datetime.now()) }) with open(self.file, "w", encoding="utf-8") as f: json.dump(self.data, f, indent=4)
The remember() method takes 3 parameters: the object itself, and role meaning who sent the message, and the message which is the actual text that we want the agent to remember.
Firstly, this method adds new message to the conversation history ["conversations"] along with the role and current time using the append() function.
After appending, the method saves the updated conversation history to the memory.json file using json.dump().
By combining these steps into one method, we don't need a separate save() method. Whenever the agent remembers a new message, it automatically saves that message to the file. This means the agent can retrieve those saved messages the next time the program starts, instead of losing its history when it closes.
Lastly, we will add the recall() method, which will be used to retrieve recent messages from the agent's memory and turn them into text that the AI can understand. In our code, we will define the method with the ability to be able to recall the last 5 entries.
def recall(self, limit=5): memories = self.data["conversations"][-limit:] text = "" for item in memories: text += item["role"] + ": " + item["message"] + "\n" return text
First, we will select the most recent message from the ["conversations"] list and store the selected entries in a variable called memories.
Next, in order to convert the memories into text, we will use a for loop that will loop through each entry in the memories list, one at a time. Each entry is stored temporarily in the variable item. memories is a list of dictionaries, and item inside the loop represents one dictionary at a time. Here, the for loop will be responsible for converting the dictionary into a text message that we can send to the LLM.
Suppose that entries look like this:
memories = [ { "role": "user", "message": "What is Python?" }, { "role": "assistant", "message": "Python is a programming language." }, { "role": "user", "message": "Give me an example." }, { "role": "assistant", "message": "Here is a simple example." }]
The for loop will convert the above data into the following:
user: What is Python?assistant: Python is a programming language.user: Give me an example.assistant: Here is a simple example.
The messages will be added to the text string and this will return the completed string containing the recent messages. The AIAgent can then include this text in its prompt so the AI model has some context from the previous conversation.
The remember() method adds and saves messages, while the recall() method retrieves recent messages and formats them as text.
Creating the Tools — Tools Class
The next component is the Tools class. While the AgentMemory class deals with the memory component of the AI Agent, this class will contain functions that will help the agent perform specific tasks. Instead of being limited to its knowledge, we will empower the agent with 2 tools: calculator and web search.
This first tool is the calculator. Let us deep dive into the calculator function.
class Tools: @staticmethod def calculator(expression): try: result = eval(expression) return str(result) except Exception as e: return ( "Calculator Error: " + str(e) )
The @staticmethod at the beginning means we can use this method without creating an object of the class first.
The calculator() function receives an expression as an input which is the mathematical calculation we want to perform. Python attempts to execute the code inside the try block. The Python function eval() evaluates the string as a Python expression and returns the result back
If an error occurs inside the try block, Python moves to except. Exception as e catches the error and stores its details in e. str(e) converts the error details into text and the function returns a message explaining that the calculation failed.
The next method we are coding in the Tools class is web_search(). This method is a simple example to demonstrate how we can add different tools to our program and make our agent more versatile. For now, we use a predefined dictionary with a few sample search results. The method does not perform a real web search. Instead, it returns a predefined answer when the user's query matches a key in the dictionary. To enable real web searches, we would need to connect our agent to a search API, such as Google’s search API or another web search service. Let us jump to the code block:
@staticmethoddef web_search(query): """ Replace this with: Google API Tavily API SerpAPI etc. """ fake_results = { "python": "Python is a popular programming language.", "ai": "AI means Artificial Intelligence." } return fake_results.get(query.lower(), "No search result found.")
We have defined web_search() as a static method. The method takes a query, which is the term we want to search for.
Next, we create a dictionary named fake_results. This contains two entries: "python" is a key with a short description of Python as its value & "ai" is a key with a short explanation of artificial intelligence as its value.
The last line looks for the query in our dictionary and returns the matching answer. If the key doesn't exist, Python returns "No search result found."
Creating the AI Agent — AIAgent Class
Now we are going to create the AIAgent Class. This class will connect everything together. It connects to the language model, provides conversation history as context, handles tool requests, and saves the conversation after the agent responds.
Let's look at the code now:
class AIAgent: def __init__(self): self.memory = AgentMemory() self.tools = { "calculator": Tools.calculator, "web_search": Tools.web_search }
First of all we will define the class and initialize the agent. This class uses the AgentMemory class and Tools class to equip the AI Agent with both memory features and the ability to use tools. When the memory object is created, the AgentMemory class loads the existing conversation history from memory.json, if the file exists.
The agent can now use its memory methods:
self.memory.recall() retrieves recent messages.
self.memory.remember() adds a message and saves the updated history.
The agent also creates a dictionary containing its available tools as can be seen above. This dictionary is important because it connects the tool name produced by the LLM to the actual Python function that should run.
Connecting the Agent to the LLM
Next, we will connect the agent to the language model.
class AIAgent: def call_llm(self, prompt): response = client.chat.completions.create( model="gpt-4.1-mini", messages=[ { "role": "system", "content": """You are an autonomous AI agent.You have tools.If you need a tool respond ONLY:TOOL:tool_name:inputAvailable tools:calculatorweb_searchExamples:TOOL:calculator:25*12TOOL:web_search:pythonOtherwise answer normally. """ }, { "role": "user", "content": prompt } ], max_tokens=500 ) return ( response .choices[0] .message .content )
The call_llm method takes the prompt as its input, sends it to the language model through the client created earlier, and returns its response.
We can specify the model used in the above code as can be seen in the code above.
We have defined the variable messages that includes both the system and the user message. The user message contains the actual prompt we want the model to process.
We set the max_tokens to 500 for the model's generated response
Finally, the method extracts the text of the model's response and returns it to the calling method. At this point, the model may have answered the user directly or requested a tool. The next step is determining whether that response is a tool request.
The run() method is the core of the agent. It brings memory, the language model, and tools together to handle a user's message. When a user asks a question, this method retrieves previous messages, sends the question to the model, checks whether a tool is needed, and saves the final conversation.
def run(self, user_input): previous_memory = self.memory.recall() prompt = f"""Previous Memory:{previous_memory}User:{user_input}""" response = self.call_llm(prompt) # ===================== # TOOL DETECTION # ===================== if response.startswith("TOOL:"): parts = response.split(":", 2) tool_name = parts[1] tool_input = parts[2] if tool_name in self.tools: print("\nUsing Tool:", tool_name) tool_result = self.tools[tool_name](tool_input) final_prompt = f"""The tool returned:{tool_result}Give final answer to user.""" response = self.call_llm(final_prompt) # Save memory self.memory.remember("user", user_input) self.memory.remember("assistant", response) return response
The run() method takes the user_input as its parameter. This is the message the user has entered. It then retrieves the previous memory using the recall() method of the AgentMemory class and stores it in the variable previous_memory
Next, we will build an updated prompt to be sent to the language model, which will consist of not only the user_input but the previous_memory as well. This prompt will be sent to the model using the call_llm() method. The model might return a normal answer, or it might request a tool. The variable response stores whatever the model returns.
Next, we will check whether a tool is needed, that is, whether the model's response begins with "TOOL:". If it does, the code treats the response as a tool request; it extracts the tool name and tool input, checks whether the tool is in the tools we defined earlier, and if so, it executes the tool request with (tool_input) passed as the input to the function self.tools[tool_name] and stores the result in tool_result .
If the model's name doesn't start with "TOOL:" the response is treated as a normal answer, and the tool-handling block is skipped.
At the end of this whole process, the code creates a final_prompt containing the tool_result and sends this prompt to the model using the call_llm() method to generate the final answer.
Once the final response has been generated, both sides of the conversation are stored using the remember() method. Finally, the method returns the assistant's response to the code that called run().
This is the final part of our program. So far, we have defined the classes and methods that handle memory, tools, and communication with the language model. Now, we need to actually start the agent and allow the user to interact with it.
This code creates an agent, waits for the user to type a message, sends that message to the agent, displays the response, and repeats until the user types exit.
Let's go through it line by line.
if __name__ == "__main__": agent = AIAgent() print("\n AI Agent Started") print("Type exit to stop\n") while True: user = input("You: ") if user.lower() == "exit": break answer = agent.run(user) print("\nAgent:", answer) print("-" * 50)
This first line is a conditional statement. When you run a Python file directly, Python sets __name__ to "__main__" and the code above checks whether that condition is true.
Then we create an object of the AIAgent class and store it in a variable called agent. When Python runs this line, the __init__() method inside AIAgent executes automatically.
The print() function displays text in the terminal. AI Agent Started tells the user that the program has started. Type exit to stop tells the user what to do if they want to stop the program.
Next, we will start an infinite loop so that the user will be able to ask multiple questions without restarting the program after every message. We will use the while loop and set its condition to True so it will keep on running unless something inside the loop stops it. Inside the loop. we will ask the user for input using the input() function. Whatever the user types is stored in the variable user as a string. The program waits at this line until the user enters a message and presses "Enter".
The next if condition statement checks whether the user wants to exit the program. In this case, Python leaves the while loop, and the program reaches the end of this section. If the input is anything else, the loop continues to the next lines.
Next we will send the user's message to the agent. If the user hasn't typed exit, this line passes their message to the run() method of our AIAgent object. The run() function handles the main workflow:
It retrieves recent conversation history.
Sends the prompt to the language model.
Executes a tool if the model requests one.
Saves the user's message and the assistant's response.
Returns the final answer.
The returned answer is stored in the variable answer. This answer is displayed as the agent's response on the screen, which can be easily read by the user.
The last line of the program is a separator. The separator makes the terminal output easier to read by visually separating one response from the next. Once the code in this loop is executed, it will go back to the first line, and the loop will only stop when the user types exit.
Now let us run the code. If you face any error, consider changing the model on OpenRouter.
The first screenshot below is when I ran the program for the second time, and it remembered my name because we have integrated memory in this AI agent.
Program Execution - AI Agent remembers name (Image by Author)
The following two screenshots show my prompt to the agent asking for ways to teach my 4-year-old phonics and the AI agent responding with fun and engaging ways to do so. Notice in the following screenshot it remembered my daughter's age without the need for me to mention it explicitly.
Program Executed (Image by Author)
AI Agent remembers previous conversations (Image by Author)
Lastly, the screenshot below shows how our agent can use the integrated tools when required to respond to our questions.
AI Agent using Tool - Calculator (Image by Author)
In this project, we brought together three simple building blocks: an LLM, memory, and tools. The LLM handles the reasoning and generates responses, memory allows the agent to recall previous interactions, and tools let it perform tasks beyond simply generating text. In future projects, we can add more tools, connect it with a real search API, as well as improve the ways in which memory is stored and retrieved instead of restricting it to the last 5 conversations only.
Increase productivity with your LLMs
June 15, 20268 min read
Parallelize any function with a single decorator.
April 19, 20214 min read
Stop trusting the pod status. An end-to-end framework for measuring the hidden microarchitectural costs and memory contention of GPU sharing among AI Agents in Kubernetes.
June 14, 202619 min read
Open Data Sets: They're Not Just For Visualizations and Models
September 6, 20214 min read
Writing to json files, reading from json files explained and illustrated with examples in python.
August 11, 20211 min read
What mattered: robust agents, glass-box reasoning, and red-team resilience
December 3, 202514 min read
Apache Airflow doesn't run tasks in parallel by default - but there's an easy fix.
March 8, 20224 min read
Visualising UK airline data to understand drivers of efficiency and to highlight aviation's environmental impact.
April 7, 202211 min read
Learn how to get the most out of agentic coding
January 13, 20267 min read
原文为英文,正文由自动抓取并保留原文。
原文发布于 Towards Data Science(Give Your Python AI Agent Persistent Memory with One JSON File),标题、摘要与正文由机器翻译,术语按行业惯例统一,未经人工逐句校订。