智能体式系统设计:自学路线图
作者:Bala Priya C,KDnuggets 特约编辑兼技术内容专家,2026 年 11 月 16 日,发表于人工智能栏目
如果你正在学习构建智能体,那就先从了解它们如何失败开始。智能体就是配备少量工具和一个目标的语言模型。它会自行选择完成任务路径,正是这种自由让它变得有用。但这也意味着,智能体有时会重复调用、凭空捏造参数,或者丢失任务所依赖的某个细节。这些失败很平常,你可以提前为之做好规划。
智能体式系统设计,就是为这些失败做规划的一门实践。你给智能体一个可供其运行的控制循环、一套能够约束它的工具契约,以及针对每一类失败的应对方式——所有这些都要在第一次运行之前就确定下来。
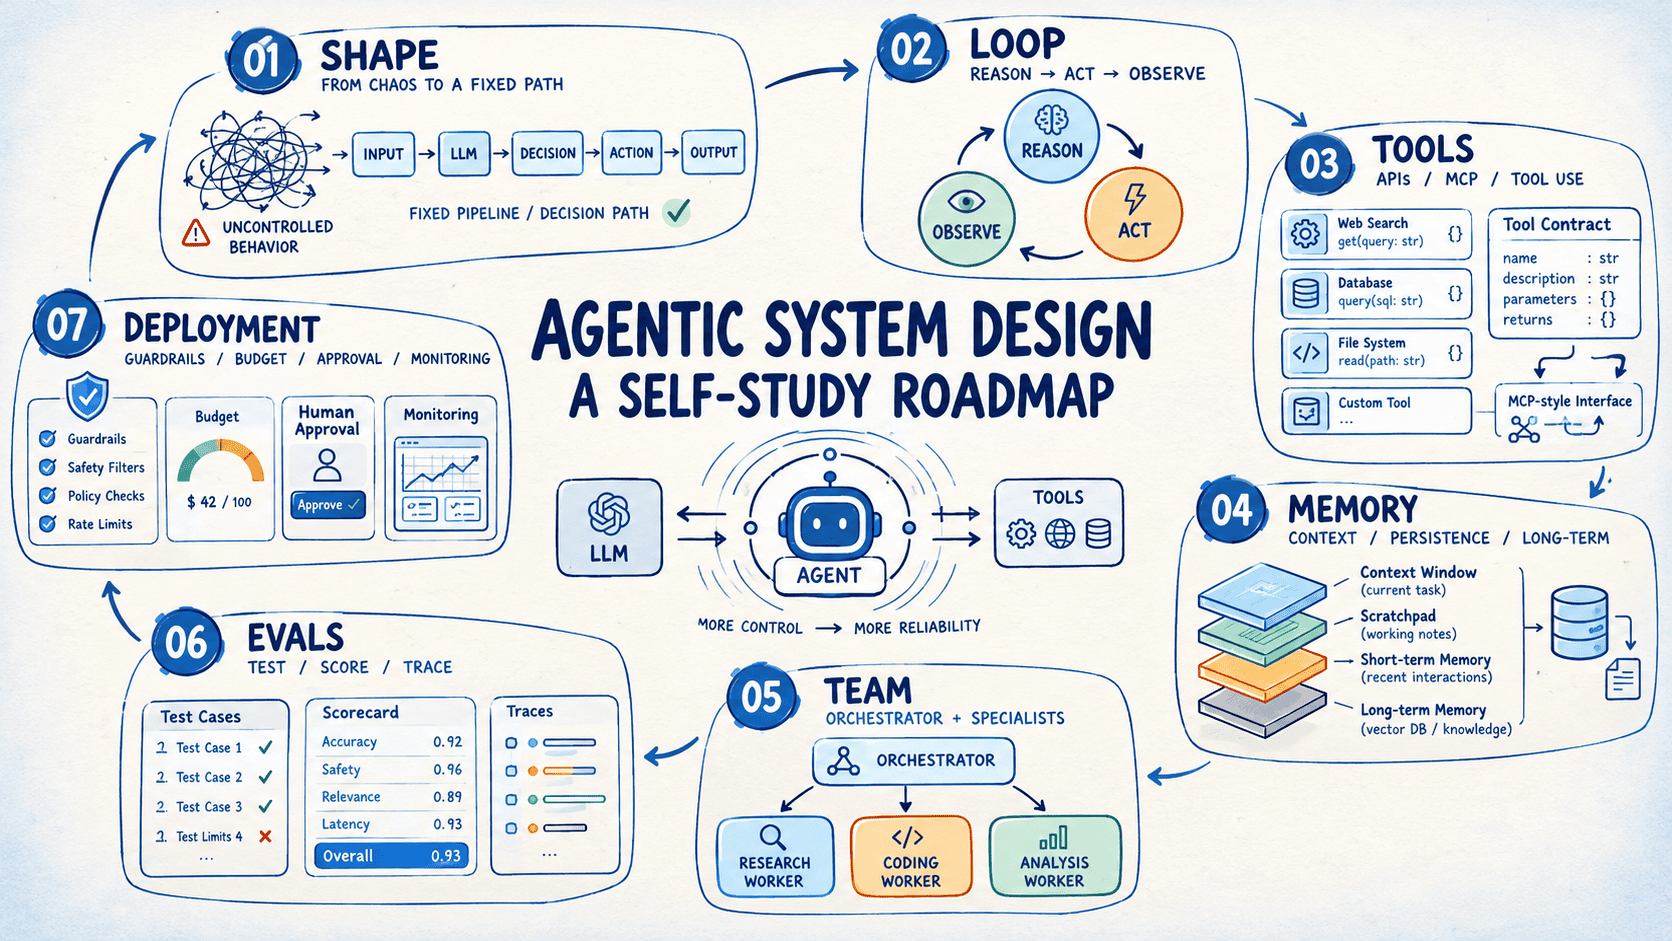
这份路线图通过一个项目来教授这套实践,分七步构建。这个项目是一个事故调查智能体,它能找出生产环境告警的根本原因。每一步只增加一个部分,因此每个概念都会落到你已经写好的代码上。你将学到如何:
判断哪些步骤由你的代码控制、哪些步骤由模型控制
在完整的多轮工具交互中追踪推理—行动循环
设计在真实使用中经得起考验的工具、记忆和多智能体协作机制
评估并部署智能体,让它完成从演示到日常使用的跨越
我们会尽量在每一步结束时附上一些资源,并为项目增加一项内容。
项目:事故调查智能体
你将构建一个事故调查智能体。它接收告警,从日志、指标、部署历史和运维手册中收集证据,并返回一份根因报告,其中包含引用的证据和拟议的修复方案。任何操作都需经人工批准。
注意:每一步都适用于任何智能体编排框架。你将在第 2 步中手工搭建这个循环,以了解其运作机制。之后你可以把同样的设计带入 LangGraph、CrewAI、Google 的 Agent Development Kit,或你已经在使用的任何框架。
十个合成事故和一条固定的分诊流水线
一个调查单个事故的工具调用循环
由 Model Context Protocol(MCP)服务器提供的六个规格明确的工具
一个草稿区(scratchpad)、输出压缩,以及已解决事故的历史记录
一个带三个并行工作器的编排器
一套包含三十个事件、带评分器的回放套件
预算、只读访问、审批门控和追踪
第 1 步:在工作流与智能体之间做选择
每个智能体式系统都始于一个关于控制权的决定:谁选择下一步?在工作流中,你的代码固定步骤顺序,模型填充每一步的内容。在智能体中,模型根据目前所见,从一组工具中选择下一个动作。
自主性是一个谱系,沿谱系每前进一步都会增加成本、延迟和变异性。因此,从满足目标的最简单形态开始,当测量到的失败需要更多灵活性时再向上提升。下表按自主性递增的顺序列出了常见形态:
一次模型调用,带有清晰的指令和示例
只有一个输入和一个输出
固定的调用序列,每次调用都使用前一次的输出
拆分为稳定的步骤,例如先起草再翻译
分类器调用将输入发送到专门的处理程序
归入不同的类别
独立调用同时运行,结果合并
包含独立的子任务
主导模型拆分工作,并在运行时将其委派出去
具有随着工作推进而出现的子任务
一次调用负责生成,另一次调用负责评审,两者循环往复
具备明确的质量标准,并能从修订中获益
模型在循环中挑选工具,直到任务完成
路径是开放式的,由每一步所揭示的信息塑造
任务分解是这一选择背后的设计技能。把任务写成一个人会遵循的编号步骤,然后将每一步标记为固定步骤或开放式步骤。固定步骤留在代码中,开放式步骤交给模型。
搭建基础。让大语言模型(LLM)生成十条合成事件,每条包含一个告警、一份应用日志、一个指标 CSV、一份部署清单和一个隐藏的根因。构建一条固定流水线,对严重程度进行分类、加载文件,并通过一次 LLM 调用写出摘要。在全部十条事件上运行它,并列出它判断错误的事件,因为这些盲点正是第 2 步引入智能体的理由。
第 2 步:构建推理—行动循环
这个循环处于每个智能体的核心:推理、行动、观察、重复。模型发出结构化的工具请求,你的代码执行它,结果作为下一条消息返回。当模型给出最终答案或触发步数上限时,循环结束。
我们来看一个例子。一个客服智能体被问到“我的订单在哪里?”时,运行过程如下:
模型推理出它需要订单记录,于是调用 order_lookup
返回结果显示订单已于周二发货,并附带一个物流追踪号
模型用该追踪号调用 carrier_tracking
结果显示包裹在某区域分拨中心出现延误,并给出了周五的新预计送达时间
模型结合当前状态和新的预计时间给出答复
这是两次工具调用、三轮推理,而且第二次调用依赖于第一次调用的结果。
在切换到框架之前,先亲手把这个循环搭一遍。它会让你明白每个框架到底自动化了什么:消息列表、工具注册表、调度器和停止条件。你还会遇到以下几种失败模式:
工具调用未通过 schema 校验
收紧 schema,并返回模型可据以采取行动的错误信息
重复的相同调用
智能体在同一个工具上打转
将调用历史保留在上下文中,并限制相同调用的次数
智能体在收集证据之前就给出答案
要求答案引用工具返回的结果
运行已失去价值却仍在继续
设置步数上限和时间预算
用循环替换固定的信息收集阶段。从 deploys_list 和 logs_get 这两个工具开始,把循环上限设为 12 步,并将每条消息保存到追踪文件。在你盲点清单中的那些事件上,把智能体给出的摘要与第 1 步的流水线做对比。
第 3 步:设计模型可用的工具
工具定义就是一份契约,模型会照着 schema 和描述所写的内容行事。大多数智能体质量问题都可以追溯到描述含糊、参数名不匹配,以及试图同时承担多项任务的工具。撰写每条描述时都要包含:这个工具做什么、什么时候使用它、以及它返回什么:
让每个工具只承担一个用途
search_customer_by_email,只带一个必填参数
logs_search、metrics_query
返回精炼、有用的上下文,并标记截断
一个 [312 more lines] 标记
在消息中说明修复方案
"start 必须是 ISO 8601 时间戳"
为每个智能体提供一组聚焦的工具
为计费智能体提供计费工具
MCP 标准化了智能体发现和调用工具的方式,因此一个工具服务器可以服务多个智能体和应用。
通过仅将 schema 交给模型并检查其做出的调用,来测试每个描述。如果调用有误,则该描述需要改进。
将工具集扩展到六个:deploys_list、logs_get、logs_search、metrics_query、git_diff 和 runbook_read。将每个结果上限设为约 2,000 Token,并带有截断标记;编写能提示有效重试的错误消息;并将该工具集封装在 MCP 服务器中,以便任何 MCP 客户端都能调用它。
第4步:为智能体赋予记忆
记忆决定智能体在每个回合知道什么。它分为三层:
当前上下文窗口:指令、工具结果、消息历史
裁剪、总结、清除旧的工具输出
当前任务的状态:计划、发现、待解决的问题
智能体更新的草稿文件或状态对象
跨运行持久保存的知识
带有关键词或嵌入搜索的数据库
上下文工程指的是精心筛选每一轮中哪些 Token 进入上下文窗口的实践。工具返回结果累积得很快,因此一旦模型提取出所需信息,就应对原始输出进行摘要或清除。
长期记忆引出两个设计问题:存储什么,以及何时检索。一个小而经过精选的存储库能让上下文聚焦于任务所需。三类长期记忆可覆盖大多数设计。语义记忆保存关于用户和领域的事实,情景记忆保存过往交互及其结果,程序性记忆保存会随反馈演进的指令。
给调查智能体一个草稿本文件,用于记录假设和已排除的原因,并把庞大的日志输出压缩成简短摘要。把每一起已解决的故障(症状、根因、修复方法)保存到一个小型 SQLite 存储库中,并在每次运行开始时检索出最相似的三个历史故障。
第 5 步:协调多个智能体
有些任务会拆分成相互独立的调查线索,一个智能体团队可以并行推进这些线索。编排者—工作者模式适用于其中大多数情况:由一个主导智能体负责规划,工作智能体在各自的上下文窗口中执行限定范围的子任务,再由主导智能体综合结果。
每个工作智能体都需要一份清晰的任务说明。一份好的任务说明包含:
用一两句话陈述的目标
一种输出格式,最好是结构化的 JSON
工作者可使用的工具
对范围与投入的边界界定
原文较长,译文为节选;译文由英文原文机器翻译,术语按行业惯例统一,可在文末展开原文核对。
查看英文原文(Agentic System Design: A Self-Study Roadmap)
By Bala Priya C, KDnuggets Contributing Editor & Technical Content Specialist on November 16, 2026 in Artificial Intelligence
If you're learning to build agents, start by learning how they fail. An agent is a language model with a few tools and a goal. It chooses its own path through the task, and that freedom is what makes it useful. It also means the agent will sometimes repeat a call, invent an argument, or lose a detail the task depended on. These failures are ordinary, and you can plan for them.
Agentic system design is the practice of planning for them. You give the agent a control loop to work inside, tool contracts it can be held to, and a response to each kind of failure, all decided before the first run.
This roadmap teaches that practice through one project, built in seven steps. The project is an incident investigator, an agent that finds the root cause of a production alert. Each step adds one piece, so every idea lands on code you've already written. You'll learn how to:
Decide which steps your code controls and which steps the model controls
Trace the reasoning-action loop through a full multi-turn tool interaction
Design tools, memory, and multi-agent coordination that hold up under real use
Evaluate and deploy an agent so it makes the jump from demo to daily use
We'll try to wrap up each step with a few resources and one addition to the project.
The Project: An Incident Investigator
You'll build an incident investigator. It receives an alert, gathers evidence from logs, metrics, deploy history, and runbooks, and returns a root-cause report with cited evidence and a proposed fix. A human approves any action.
Note: Every step works with any agent orchestration framework. You'll build the loop by hand in Step 2 to see the mechanics. Then you can carry the same design into LangGraph, CrewAI, Google's Agent Development Kit, or whichever framework you already use.
Ten synthetic incidents and a fixed triage pipeline
A tool-calling loop that investigates one incident
Six well-specified tools behind a Model Context Protocol (MCP) server
A scratchpad, output compaction, and a history of solved incidents
An orchestrator with three parallel workers
A thirty-incident replay suite with graders
Budgets, read-only access, an approval gate, and tracing
Step 1: Choosing Between a Workflow and an Agent
Every agentic system starts with one decision about control: who picks the next step? In a workflow, your code fixes the sequence of steps and the model fills in the content at each step. In an agent, the model chooses its next action from a set of tools, based on what it has seen so far.
Autonomy is a spectrum, and each move along it adds cost, latency, and variability. So start with the simplest shape that meets the goal, and move up when a measured failure calls for more flexibility. The table lists the common shapes in order of increasing autonomy:
One model call with clear instructions and examples
Have one input and one output
A fixed sequence of calls, each using the previous output
Split into stable steps, such as draft then translate
A classifier call sends the input to a specialized handler
Fall into distinct categories
Independent calls run at once and the results merge
Contain independent subtasks
A lead model splits the work and delegates it at runtime
Have subtasks that emerge while the work proceeds
One call generates, another critiques, and the pair repeats
Have clear quality criteria and gain from revision
The model picks tools in a loop until it finishes
Have open-ended paths shaped by what each step reveals
Task decomposition is the design skill behind this choice. Write the task as numbered steps a person would follow, then mark each step as fixed or open-ended. Fixed steps stay in code, and open-ended steps go to the model.
Set up the foundation. Ask a large language model (LLM) to generate ten synthetic incidents, each with an alert, an application log, a metrics CSV, a deploy list, and a hidden root cause. Build a fixed pipeline that classifies severity, loads the files, and writes a summary with one LLM call. Run it on all ten and list the incidents it misjudges, because those blind spots justify the agent in Step 2.
Step 2: Building the Reasoning-Action Loop
The loop sits at the center of every agent: reason, act, observe, repeat. The model emits a structured tool request, your code executes it, and the result returns as the next message. The loop ends when the model gives a final answer or a step cap triggers.
Let's trace one example. A support agent that's asked "Where is my order?" runs like this:
The model reasons that it needs the order record and calls order_lookup
The result shows the order shipped Tuesday with a tracking number
The model calls carrier_tracking with that number
The result shows a delay at a regional hub and a new estimate for Friday
The model answers with the status and the new estimate
That's two tool calls and three rounds of reasoning, and the second call depends on the result of the first.
Build this loop by hand once before you switch to a framework. It teaches you what every framework automates: the message list, the tool registry, the dispatcher, and the stop conditions. You'll also run into these failure modes:
The tool call fails schema validation
Tighten the schema and return an error the model can act on
Repeated identical calls
The agent circles one tool
Keep call history in context and cap identical calls
The agent answers before gathering evidence
Require the answer to cite tool results
The run continues past its useful life
Set a step cap and a time budget
Replace the fixed gathering stage with a loop. Start with two tools, deploys_list and logs_get, cap the loop at 12 steps, and save every message to a trace file. Compare the agent's summaries with the Step 1 pipeline on the incidents in your blind-spot list.
Step 3: Designing Tools the Model Can Use
A tool definition is a contract, and the model follows what the schema and description say. Most agent quality problems trace back to ambiguous descriptions, mismatched parameter names, and tools that try to do multiple jobs at once. Write each description to include what the tool does, when to use it, and what it returns:
Give each tool one purpose
search_customer_by_email with one required parameter
logs_search, metrics_query
Return compact, useful context and mark truncation
A [312 more lines] marker
State the fix in the message
"start must be an ISO 8601 timestamp"
Present a focused set of tools per agent
Give a billing agent the billing tools
The MCP standardizes how agents discover and call tools, so one tool server can serve many agents and applications.
Test each description by handing the schema alone to a model and checking the call it makes. If the call is wrong, the description needs work.
Grow the toolset to six: deploys_list, logs_get, logs_search, metrics_query, git_diff, and runbook_read. Cap each result at about 2,000 tokens with a truncation marker, write error messages that suggest a valid retry, and wrap the set in an MCP server so any MCP client can call it.
Step 4: Giving the Agent Memory
Memory decides what the agent knows at each turn. It comes in three layers:
The current context window: instructions, tool results, message history
Trimming, summarizing, clearing old tool output
State for the current task: plan, findings, open questions
A scratchpad file or state object the agent updates
Knowledge that persists across runs
A database with keyword or embedding search
Context engineering is the practice of curating which tokens enter the window on each turn. Tool results accumulate fast, so summarize or clear raw output once the model has extracted what it needs.
Long-term memory raises two design questions: what to store and when to retrieve it. A small, curated store keeps the context focused on what the task needs. Three kinds of long-term memory cover most designs. Semantic memory holds facts about users and domains, episodic memory holds past interactions and their outcomes, and procedural memory holds instructions that evolve with feedback.
Give the investigator a scratchpad file for hypotheses and ruled-out causes, and compact large log output into short digests. Save each solved incident (symptoms, root cause, fix) to a small SQLite store, and retrieve the three most similar past incidents at the start of every run.
Step 5: Coordinating Multiple Agents
Some tasks split into independent lines of inquiry, and a team of agents can pursue them in parallel. The orchestrator-worker pattern fits most of them: a lead agent plans, workers execute scoped subtasks in their own context windows, and the lead synthesizes the results.
Each worker needs a clear brief. A good brief contains:
An objective stated in one or two sentences
An output format, ideally structured JSON
The tools the worker may use
Boundaries on scope and effort
Multi-agent runs multiply token use several times over, so reserve them for tasks with parallel structure and enough value to justify the cost. Scale effort to the task: a simple query gets one worker and a complex one gets several. Build with two agents first and add more only when a measured need appears.
Split the investigator into three workers: logs_analyst, metrics_analyst, and change_analyst, each holding a subset of the tools. Have the orchestrator launch them concurrently, collect JSON findings with evidence and a confidence level, and write one report with citations.
Step 6: Evaluating Agent Behavior
Evals turn agent quality into a number you can improve. Build a test set of representative tasks with known-good outcomes before you tune anything, and check each layer of behavior:
Example for a support agent
The agent called order_lookup for a status question
The order ID matches the customer's messages
Code for exact match, LLM judge for quality
The answer states the correct delivery estimate
The run finished within six steps and avoided repeated calls
Outputs vary between runs, so run each task several times and track the pass rate. When a task fails, read the full trace and sort the failure into a category: tool selection, arguments, memory, or synthesis. Each category points to a different fix: a tool description, a prompt, a memory change, or a different model.
Grow the incidents to thirty with variants such as expired certificates, disk exhaustion, and DNS failures. Write a script that replays each incident three times, records tool calls, tokens, and the reported root cause, and scores root-cause accuracy and evidence citations. Keep a scoreboard and rerun it after every change.
Step 7: Deploying with Guardrails
The last step wraps the agent in limits, permissions, and visibility so a team can rely on it. The table lists the controls to add:
Bounds latency and spend
Limits what a wrong call can affect
Read-only credentials, allowlisted commands
Places a human ahead of state-changing actions
A confirmation message before a restart
Records every model call and tool call
JSONL traces and a cost dashboard
Scores every change before release
A continuous integration (CI) job that blocks a merge on a score drop
Text that tools return comes from other systems, so treat it as data. Fence tool output with delimiters and tell the model that content inside the fence is data. Then roll out in stages:
Shadow mode: the agent runs beside people and its output gets reviewed
Assist mode: the agent's output reaches people as suggestions
Wider use: the agent handles a defined slice of work under monitoring
Wrap the investigator for daily use. Add the budgets from the table, give the tools read-only access, list remediation as suggested commands behind an approval message, fence log text as data, emit traces, and trigger runs from your alerting webhook. Run it beside on-call engineers for two weeks and compare its reports with their write-ups.
By Step 7, your incident investigator is a working service with a test suite behind it. You have a loop you built by hand, tools specified well enough to trust, memory that carries context across incidents, workers that split the investigation when it helps, evals that catch regressions, and guardrails that keep it safe to run unattended.
This sequence carries over to the next agent you build. A few directions you can explore from here:
Swap the synthetic incidents for a feed from your own logging or alerting stack, and see where the Step 3 tool descriptions stop holding up against real formats
Pick one orchestration framework and reimplement the loop in it, now that you know what it automates
Build a second project with a different shape from Step 1, such as a routing workflow or an evaluator-optimizer loop, to learn the difference between a workflow and an agent in your own code
Put the Step 6 eval suite into CI before changing the agent again, so every later change gets measured against your scoreboard
Bala Priya is a developer, educator, and technical writer based in India. She writes about programming, data science, machine learning, and AI, with a focus on making complex technical ideas practical and approachable. She creates tutorials, how-to guides, and deep dives that help developers build, solve problems, and understand complex technical concepts. Her technical interests include LLM applications, agentic AI, graph algorithms, computer vision, explainable AI, and ML systems. When she’s not writing or coding, Bala is usually reading classic literature, epic fantasy, or speculative fiction. She also enjoys talking about books, learning new things, and sharing what she learns with the developer community.
原文为英文,正文由自动抓取并保留原文。
原文发布于 KDnuggets(Agentic System Design: A Self-Study Roadmap),标题、摘要与正文由机器翻译,术语按行业惯例统一,未经人工逐句校订。